Tech/weblogic - 해당되는 글 6건

Introduction

New in this release of Coherence*Web is a deployment option on the WebLogic Server platform that enables a tighter integration with WebLogic Server. The installation and configuration options described here only apply to WebLogic Server 10.3 deployments. It should be noted that the configuration of Coherence*Web for WebLogic Server is likely to change in future releases as Coherence*Web is even more tightly integrated into the WebLogic Server.


Overview of Coherence*Web SPI

Coherence*Web is not a replacement for WebLogic Server's in-memory HTTP state replication services. However, Coherence*Web should be considered when an application has large Http Session State objects, when running into memory constraints due to storing Http Session object data, and/or have existing Coherence Cluster and would like to offload Http Session storage to a Coherence Cluster.

The most significant change introduced by this new deployment option is that applications deployed using the Coherence*Web SPI module no longer require an application to be instrumented by the Coherence*Web WebInstaller.

Installation

Location of the WebLogic Server Coherence*Web SPI in Coherence Distribution

The Weblogic Server Coherence*Web SPI consists of the coherence-web-spi.war file, located in the coherence\lib directory in the Coherence distribution. The coherence.jar file, located in the same directory, is also necessary for enabling Coherence*Web functionality in WebLogic Server.


Requirements for using Coherence*Web SPI

The Coherence*Web SPI for Weblogic Server requires that a load balancer which enforces http session JVM affinity is running in front of the WebLogic Server tier. WebLogic Server ships with several different proxy plug-ins which will enforce JVM session stickiness. Documentation for configuring the WebLogic Server proxy plug-in is available here.


Overview Of Configuration and Deployment

The Coherence*Web distribution includes a deployable shared library that contains a native plugin to WebLogic Server's Http Session Management interface. To enable Coherence*Web on WebLogic Server for a web application, you must complete the following steps:

  1. Apply WebLogic Server publically available Patch ID N41D to all WebLogic Server instances that are hosting the web application(s) that will leverage Coherence*Web. Please see the instructions for using Smart Update to install WebLogic Server patches. For production environments it is recommended that you review the Smart Update production installation notes.
    1. Login in using your Support ID and Password.
    2. Download and apply patch N41D. Restart WebLogic Server.
  2. Optionally modify the session-cache-config.xml to customize the Cache topology for Coherence*Web. This configuration file is located in the /WEB-INF/classes directory within the coherence-web-spi.war file. If this file is modified, it should be updated in coherence-web-spi.war.
  3. Start a Cache Server Tier in a seperate JVM from the one running WebLogic Server per the instructions below.
  4. Determine the appropriate packaging based on your deployment requirements and follow the appropriate packaging instructions.
  5. Optionally modify the web.xml and weblogic.xml files in the WAR deployment if advanced configuration is required for a web application using Coherence*Web.
    If you are deploying Coherence*Web in a WebLogic Portal environment please see the Coherence*Web and WebLogic Portal page for installation instructions.

Coherence*Web WebLogic SPI-Specific Configurations

There are two differences between the default cache configuration for the Coherence*Web SPI for WebLogic Server and Coherence*Web:

  1. The Coherence*Web SPI for WebLogic Server is configured with local-storage disabled. This means a Coherence Cache Server must be running in its own JVM, separate from the JVM running WebLogic Server.
  2. The timeout for requests to the cache server to respond is 30 seconds. If a request to the cache server has not responded in 30 seconds, a com.tangosol.net.RequestTiemoutException exception is thrown.

The Coherence caches used by the Coherence*Web SPI is configured by the session-cache-config.xml file. The session-cache-config.xml file is located inside the coherence-web-spi.war file under the WEB-INF\classes directory. Any cache configuration change should be put inside session-cache-config.xml, and then should be repackaged inside coherence-web-spi.war.


To Configure and Start a Cache Server

A Cache Server JVM is a dedicated Coherence JVM that is responsible for storing and managing all cached data (in this case, HttpSession state). One or more Cache Server JVMs must be started before the WLS/WLP JVMs can be started.

  1. Create a script for starting a Cache Server JVM. The following is an very simple example of a script that starts a storage-enabled Cache Server for use with Coherence*Web. This example assumes that you are using a Sun JVM. See this page for information on tuning your particular JVM.

    java -server -Xms512m -Xmx512m -cp <Coherence installation dir>/lib/coherence.jar:<Coherence installation dir>/lib/coherence-web-spi.war -Dtangosol.coherence.management.remote=true -Dtangosol.coherence.cacheconfig=WEB-INF/classes/session-cache-config.xml -Dtangosol.coherence.session.localstorage=true com.tangosol.net.DefaultCacheServer

  2. Start one or more Cache Server JVMs using the script described above.

Packaging and Configuration Considerations

As part of the Coherence*Web SPI for WebLogic Server you will find the coherence.jar and coherence-web-spi.war located in the /lib directory of the Coherence 3.4.2 distribution.

Coherence cluster nodes are class loader scoped. Therefore, controlling the number of unique Coherence cluster nodes in a Coherence*Web deployment needs to be decided prior to packaging the application(s). The different options are listed below and are described in detail on the Cluster Node Isolation in Coherence*Web page:

  • Application Server Scoped Cluster Nodes
  • EAR Scoped Cluster Nodes
  • WAR Scoped Cluster Nodes
    Be Careful

    The Application Server Scoped Cluster Nodes configuration should be considered very carefully and never used in environments where application interaction is unknown or unpredictable.

    An example of such environment may be a deployment where multiple development teams are deploying independently written applications without coordinating and enforcing their conventions and naming standards carefully. With this configuration, all applications are part of the same cluster and the likelihood of collisions between namespaces for caches, services and other configuration settings is quite high and may lead to unexpected results.

    For these reasons we strongly recommend either the EAR Scoped or WAR Scoped cluster node configurations. If you are in doubt as to which deployment topology to choose or if this warning applies to your deployment, please do not choose this configuration.


Packaging and Configuring Application Server Scoped Cluster Nodes

  1. Deploy coherence-web-spi.war as a shared library on each WebLogic Server.
  2. Edit you WebLogic Server system classpath to include coherence.jar or copy coherence.jar to you $DOMAIN_HOME/lib directory.
  3. Enable Coherence*Web in your web application by adding the following to stanza in the weblogic.xml in each WAR file deployed in the WebLogic Server that intends to leverage Coherence*Web:

    <weblogic-web-app>
    ...
    <library-ref>
    <library-name>coherence-web-spi</library-name>
    <specification-version>1.0.0.0</specification-version>
    <implementation-version>1.0.0.0</implementation-version>
    <exact-match>false</exact-match>
    </library-ref>
    ...

    </weblogic-web-app>

Packaging and Configuring EAR Scoped Cluster Nodes

  1. Deploy coherence-web-spi.war as a shared library on each WebLogic Server.
  2. Place coherence.jar in the EAR's APP-INF/lib directory.
  3. To enable Coherence*Web create a shared library reference in each web application in the EAR by adding the following stanza weblogic.xml:

    <weblogic-web-app>
    ...
    <library-ref>
    <library-name>coherence-web-spi</library-name>
    <specification-version>1.0.0.0</specification-version>
    <implementation-version>1.0.0.0</implementation-version>
    <exact-match>false</exact-match>
    </library-ref>
    ...
    </weblogic-web-app>

Packaging and Configuring WAR Scoped Cluster Nodes

  1. Deploy coherence-web-spi.war as a shared library on each WebLogic Server
  2. Place coherence.jar in the WAR's WEB-INF/lib directory.
  3. Create a reference to the shared library by modifying the weblogic.xml in web applications WEB-INF directory.

    <weblogic-web-app>
    ...
    <library-ref>
    <library-name>coherence-web-spi</library-name>
    <specification-version>1.0.0.0</specification-version>
    <implementation-version>1.0.0.0</implementation-version>
    <exact-match>false</exact-match>
    </library-ref>
    ...
    <weblogic-web-app>

Coherence*Web Configuration Options

Since Coherence*Web is in control of the http session lifecycle, most data from the <session-descriptor> element in either weblogic.xml or weblogic-application.xml is ignored. Most of Coherence*Web configuration can be done through <context-param> in web.xml. The default configuration included in the SPI should be sufficient for most web application usages, but all configurations options can be overidden using <context-param>

The following Coherence*Web settings can be configured in web.xml using <context-param>:


Please see the Configuring Coherence*Web page for detailed information on each of the above parameters.

The generated Http session cookie can be configured in weblogic.xml or weblogic-application.xml using <session-descriptor>:


In WebLogic SPI module the following Coherence Web Configuration parameters are not controlled by the Coherence Web Configuration parameters and will need to be specified as outlined below instead:


Using SAML SSO

By default, WebLogic Server provides basic SSO functionality. To leverage SAML SSO functionality with Coherence*Web, the saml2.war web application must be modified.

  1. Backup the existing saml2.war in the WebLogic Server installation.
  2. Unjar the saml2.war into a temporary directory. The saml2.war is located in the $WL_SERVER_HOME/server/lib directory.
  3. Create a lib and classes directory under the WEB-INF directory.
  4. Unjar the coherence-web-spi.war to retrieve coherence-web.jar and coherence-web-spi.jar. Put these two jars in the /WEB-INF/lib directory.
  5. Copy the session-cache-config.xml, located in the /WEB-INF/classes directory from the exploded coherence-web-spi.war, into the the created /WEB-INF/classes directory.
  6. Place the coherence.jar in the proper location, based on the cluster node scoping you selected: Application Server, EAR or WAR scoped.
  7. Add the following to the /WEB-INF/web.xml file:

    <?xml version="1.0" encoding="UTF-8"?>
    <web-app>..
    <context-param>
    <param-name>coherence-web-sessions-enabled</param-name>
    <param-value>true</param-value>
    </context-param>
    ...
    </web-app>
  8. Re-assemble the saml2.war by using the jar command, e.g.:

    jar cvf saml2.war $tempdir
  9. Backup the existing saml2.war in the WebLogic Server installation.
  10. Replace the saml2.war in the WebLogic installation with the modified saml2.war.

Known Limitations

By default, Coherence*Web creates a single HTTP session across all web applications for each client and scopes the session attributes to a each web application. This means that if a session is invalidated in one web application, that same session is invalidated for all web applications in WebLogic Server using Coherence*Web.

This functionality requires that the session cookie path is set to "/", making the same session cookie available to all web applications. If this is not the desired behavior, a potential workaround is to reduce the scope the session cookie by adding the following entry to weblogic.xml in each web application:

<weblogic-web-app>
...
<session-descriptor>
<cookie-path>[path of web-app context, for example "/mainApp/subApp"]</cookie-path>
</session-descriptor>
...
</weblogic-web-app>

This will ensure a unique session is created for each web application. It is also possible to scope the session to all web-applications within an EAR file by setting the session cookie path to the context root of the deployed EAR.

This workaround around will not work if you deploy an EAR or web-application with '/' as the context path, or if you require WebLogic Single Sign-On. WebLogic Single Sign-On requires that the session cookie path be set to '/'.

      Tech/weblogic  |  2009. 3. 23. 17:44


Using REST with Oracle Service Bus

Overview

Oracle Service Bus (OSB), the rebranded name for BEA's AquaLogic Service Bus, is one of the products I help customers with frequently.  Recently questions from both customers and internally at Oracle have been increasing about OSB support for REST. In this entry I cover the current and future state of REST support in OSB.

Background

REST can be a loaded term.  There are a couple of InfoQ articles introducing REST and REST Anti-Patterns that should be required reading for those considering a REST architecture.  What does REST support really mean in the context of an Enterprise Service Bus?

A Service Bus applies mediation to both clients and providers of services.  This results in a loosely coupled architecture, as well as other benefits.  Being loosely coupled means that Providers and Consumers can now vary different aspects of a message exchange:

  • Location of Provider/Consumer
  • Transport (Http, Https, JMS, EJB, FTP, Email, etc)
  • Message Format (SOAP, POX - Plain Old Xml, JSON, txt, etc)
  • Invocation Style (Asynchronous, Synchronous)
  • Security (Basic Auth, SSL, Web Service Security, etc)

Two aspects where Service Bus support for REST would apply in an example would be Transport and Message Format.

A Contrived But Realistic Example

orderService

OrderDiagram 

Consider a contrived example where REST support in the Service Bus could easily come up.  Assume an organization already has an Order SOAP based service that is mediated by the Service Bus.  Currently this service is used by several applications from different business units.  SOAP web services with well-known XSD contracts work great for an interchange format for existing systems.  However, there is a new initiative to give management a mobile application to get order status.  The sponsoring executive has heard that AJAX is important and tasked an intern to quickly build the front-end because of frustration with IT delays.  The front-end is quickly mocked up using an AJAX framework and the executive tells the IT staff to deploy it immediately.  The problem is that the client-side AJAX framework doesn't work with SOAP and XML, it was mocked up with JSON.

Instead of developing a second Order Service to support this new invocation style and format, OSB can be configured to mediate both the invocation style and the message format and reuse the perfectly working, tested, provisioned, etc Order Service.  A new proxy could be configured to accept HTTP requests and map them to SOAP over HTTP.  The response, which is normally XML described by XSD, can be converted to JSON.

OSB Capabilities

A common REST approach in practice is the use of HTTP verbs POST, GET, PUT, and DELETE to correspond to the CRUD methods of CREATE, READ, UPDATE, DELETE.  So we can map those verbs to the Order Service, mapping DELETE to cancelOrder since it is against company policy to delete orders from the system.

The HTTP transport for inbound requests (a Proxy) in the Service Bus provides a mechanism to intercept invocations to a user customized URI base path.  So if my server binds to the context "user_configured_path" and localhost and port 7001, then the HTTP Proxy intercepts all HTTP GET and POST calls to http://localhost:7001/user_configured_path .  This includes suffixes to that path such as http://localhost:7001/user_configured_path/foo/bar/etc .

AquaLogic Service Bus 3.0 (as well as 2.x releases of ALSB) supports GET and POST use cases, but does not have developer friendly support for HTTP verbs PUT and DELETE out of the box.  For GET requests, pertinent information is available in the $inbound/ctx:transport/ctx:request/http:relative-URI variable.  To parse query string information, use $inbound/ctx:transport/ctx:request/http:query-string.   A common pattern for HTTP GET is to use XQuery parsing functions on that variable to extract extra path detail, but the $body variable will be empty.  For POST requests, the same applies, but the $body variable may have a message payload submitted as xml, text, or some other format.

I have heard from product management that first class support for HTTP verbs such as PUT and DELETE is planned in the next release of OSB, which is scheduled sometime in the Fall of 2008.  For customers that require PUT and DELETE verb support immediately, OSB does have a transport SDK, which could be used to add inbound and outbound REST support.  That approach would require some development.  There are other inbound options besides the transport SDK, such as a basic approach of deploying an HTTP servlet with doDelete() and doPut() implemented.  This servlet could be deployed on OSB instances and forward to specific proxies to provide PUT and DELETE support.  An outbound option would be to use a java call-out to invoke a REST style provider.

Returning to the example for a moment, the executive dashboard only requires order status in the first release, so only HTTP GET support is necessary.  In the existing SOAP-based Order Service, the interaction looks like this:

orderRR

An equivalent REST-ful URL might look like http://localhost:7001/Order/123 where 123 is the OrderID.  Clients using this interface might expect a JSON response like this:

{
"Status":"Submitted",
"OrderID":"123",
"OrderDetailID":"345",
"CustomerID":"234"
}

Types like int are supported JSON values, although the above value types are strings as you can see by the double quotes.  Let's just assume that strings are ok for now to make this easier.  Here is a proxy configuration bound to the Order URI context:

OrderRESTProxy

Notice that the response type is "text" because we will convert the XML to JSON.  I tried using the JSON java library from json.org to convert xml nodes in the response to a JSON format.  One gotcha is namespace conversion.  For simplicity I tested with xml nodes with no namespaces, and that worked.  That code looks like this: 

org.json.JSONObject j = org.json.XML.toJSONObject( xmlStringBuffer.toString() );
System.out.println( j.toString() );

There are other techniques to convert between XML and JSON that use convention to map namespaces to JSON structures, but that is for another time.  Because my example used real-world xml with namespaces, I used a java callout to loop over child nodes of an XmlObject to build the JSON structure in java code.  Let me know what you think and if you have considered alternative approaches.  I've attached my code artifacts that are completely for illustrative purposes only and worked on my machine with ALSB 3.0 and Workshop 10.2.

For another example that works with currently released versions of Service Bus, check out "The Definitive Guide to SOA - BEA AquaLogic Service Bus" by Jeff Davies.  In the book he has a Command example where a Proxy is used for a service that handles multiple types of commands.  An updated version of the book should be available shortly.


http://blogs.oracle.com/jamesbayer/2008/07/using_rest_with_oracle_service.html

      Tech/weblogic  |  2009. 3. 9. 17:01


Monitoring WebLogic using JMX

March 16, 2007 – 1:29 pm

It's not as straightforward as you might think or expect, but once setup, gives a lot more insight into the behavior of your applications. Use your favorite JMX client (jconsole, jManage, SiteScope, MC4J, etc.) to monitor thread pools, database connections, memory usage and any other MBean attributes.

There are two ways (that I know of) to enable a WebLogic application for monitoring using JMX.

  • Enable IIOP and default user for the WebLogic server
  • Use the Java 5 JMX remote capabilities

Enable IIOP and default user for the WebLogic server

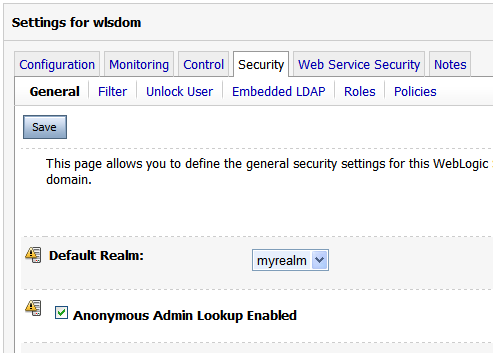
Step 1: Enable Anonymous Admin Lookup

From the WebLogic documentation:

The Anonymous Admin Lookup Enabled option specifies whether anonymous, read-only access to WebLogic Server MBeans should be allowed from the MBean API. With this anonymous access, you can see the value of any MBean attribute that is not explicitly marked as protected by the Weblogic Server MBean authorization process. This option is enabled by default to assure backward compatibility. For greater security, you should disable this anonymous access.

To verify the setting of the Anonymous Admin Lookup Enabled option through the WebLogic Administration Console, see the Domain: Security: General page in the Administration Console or the SecurityConfigurationMBean.AnonymousAdminLookupEnabled attribute.

Step 2: Enable IIOP Protocol for Admin Server and Application Servers
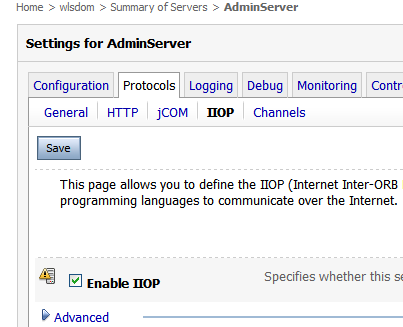
  • In the Server Settings' Protocol tab, check "Enable IIOP"
  • Enter the Default IIOP Username and Default IIOP Password.

If you don't do this, you will get an error similar to the following when you try to establish an rmi connection:
org.omg.CORBA.NO_PERMISSION: User does not have permission on weblogic.management.mbeanservers to perform lookup operation. vmcid: 0 completed: No

Then you can use the JMX URL to connect to an individual application server:
service:jmx:rmi:///jndi/iiop://127.0.0.1:7001/weblogic.management.mbeanservers.runtime

or if you connect to the Admin server, you can view the MBeans for all the servers in the cluster using this URL:
service:jmx:rmi:///jndi/iiop://127.0.0.1:7001/weblogic.management.mbeanservers.domainruntime

See also: Enable and configure IIOP

Use Java 5 JMX remote

Add the following command-line options to the start script for the WebLogic server you want to monitor:
-Dcom.sun.management.jmxremote
-Dcom.sun.management.jmxremote.port=8888
-Dcom.sun.management.jmxremote.ssl=false
-Dcom.sun.management.jmxremote.authenticate=false

Then, you can connect using this JMX URL:
service:jmx:rmi:///jndi/rmi://127.0.0.1:8888/jmxrmi
and you will got not only the com.bea MBeans, but all of the Java 5 MBeans, also.

Troubleshooting

If there are a large number of MBeans in your monitored application, you may run into a problem using Windows where the IIOP connection will timeout. You may see an error like this:

Internal communication failed. (in getResults) org.omg.CORBA.COMM_FAILURE:
vmcid: SUN minor code: 208 completed: Maybe

In this case you can set the com.sun.CORBA.transport.ORBTCPReadTimeouts property to adjust the transport read tcp timeout property, which is a colon separated property with the following syntax.

<initial time to wait: max read giop header time to wait: max read message time to wait: backoff factor>

If you are getting this error, then you can add this option to the jconsole command line, adjusting the 2nd value higher as needed. This example sets the timeout to 30 seconds:

jconsole -J-Dcom.sun.CORBA.transport.ORBTCPReadTimeouts=10:30000:500:10

Incorporating into LoadRunner

Once you have enabled the JMX monitors, you can then incorporate this data into your LoadRunner test scenarios using SiteScope. SiteScope is an agent-less monitoring tool that actually comes bundled with LoadRunner and is free (up to 500 monitoring "points") for non-production use.

      Tech/weblogic  |  2009. 3. 5. 11:04


WLS 9/10 에서 JMX MBean 브라우저 jconsole 사용하기 기술자료

2008/05/06 13:37

복사 http://blog.naver.com/javalove93/130031031944

WebLogic 서버는 6.0 버전부터 JMX 를 지원했다. 하지만 그것은 JMX 가 완전히 표준 스펙이 되기 전이었다.
 
WLS 9.0 부터는 완전히 표준화된 JMX 1.2 (JDK 1.5 에 포함) 를 지원하기 때문에, JMX 스펙을 따르는 범용 JMX MBean 브라우저와 호환이 된다. JDK 1.5 에 포함된 jconsole 은 이러한 범용 JMX 브라우저 중에서 가장 강력한 툴이다. jconsole 을 사용하여 WLS 9.0 또는 10.0 에 접속하는 방법에 대해 알아 본다.
 
 
1. WLS 부팅 시 다음 옵션을 지정 (포트 번호 상관 없음)
 
set JAVA_OPTIONS=-Dcom.sun.management.jmxremote.port=9543 -Dcom.sun.management.jmxremote.authenticate=false
    -Dcom.sun.management.jmxremote.ssl=false
 
포트 번호 없는 경우
 
set JAVA_OPTIONS=-Dcom.sun.management.jmxremote -Dcom.sun.management.jmxremote.authenticate=false
 
2. Domain | Security 에서 Anonymous Admin Lookup Enabled 체크


3. Server | Protocols | IIOP 에서 Enabled IIOP 체크 (Default Username 과 Password 도 WLS Admin ID/PW 로 지정)


4. jconsole 실행하여 다음 JMX URL 로 접속 (ID/PW 없이)
 
service:jmx:rmi:///jndi/iiop://localhost:7001/weblogic.management.mbeanservers.runtime
 
 
위와 같이 접속이 되면 아래 그림처럼 모든 JMX MBean 들을 GUI 형태로 액세스할 수 있다.

'Tech > weblogic' 카테고리의 다른 글

Coherence*Web and WebLogic Server  (0) 2009.03.23
Using REST with Oracle Service Bus  (0) 2009.03.09
Monitoring WebLogic using JMX  (0) 2009.03.05
Installing and Displaying the WLDF Console Extension  (0) 2009.03.04
Enable trust between domains  (0) 2008.03.29
      Tech/weblogic  |  2009. 3. 4. 10:53


Weblogic에서 JVM또는 자원 상황이 궁금할때~ 아래와 같이

Installing and Displaying the WLDF Console Extension

The WebLogic Diagnostic Framework (WLDF) Console Extension is included with WebLogic Server, but it is not installed by default. The following section describes how to install and display the WLDF Console Extension:


Installing the WLDF Console Extension

The WLDF Console Extension is delivered as a Java Archive (JAR) file, named diagnostics-console-extension.jar. You must install this JAR file into the Administration Server for a domain for the WLDF Console Extension to be incorporated into the WebLogic Server Console for that domain.

Installation Prerequisites

Before you can install and run the WLDF Console Extension, you need:

  • WebLogic Server 9.1 or higher installed
  • A Web browser that meets the requirements for running the Weblogic Server 9.1 or higher Administration Console
  • Java Plug-in version 1.5 (J2SE Runtime Environment 5.0)
  • Java and JavaScript enabled in your browser

Installing the Java Plug-in

For browsers other than Mozilla or Firefox in a Linux environment, if the Java plug-in 1.5 is not already installed in your Web browser, you will be prompted to initiate a download from the Sun Microsystems Java Web site. Follow the instructions on screen.

Alternatively, install the plug-in manually when you begin the installation process for the WLDF Console Extension:

  1. Go the Java Software download page, at:
  2.    http://java.com/en/download/

  3. Follow the instructions on screen.

If you are using Mozilla or Firefox on a Linux machine, you must install libjavaplugin_oji.so into your <browser_install>/plugins directory.

Installing the WLDF Console Extension

To install the WLDF Console Extension:

  1. Find the diagnostics-console-extension.jar file in the WL_HOME\server\lib\console-ext directory, where WL_HOME is the directory in which you installed WebLogic Server.
  2. Copy diagnostics-console-extension.jar into the DOMAIN-DIR/console-ext directory for every domain in which you want to use the Console Extension, where DOMAIN-DIR is the domain's root directory.
  3. Restart the Administration Server for the domain where you installed the extension. The Administration Console for the domain is then deployed with the WLDF Console Extension.

Enable or disable the WLDF Console

You can enable or disable the WLDF Console Extension from the Administration Console:

  1. In the banner toolbar region at the top of the right pane of the Console, click Preferences (to the right of the Logout link).
  2. Select the Extensions tab.
  3. In the list of extensions at the bottom of the page, select the check box for diagnostics-console-extension and click Enable to enable the extension or Disable to disable it.
  4. Restart the Administration Server for the domain where you enabled or disabled the extension.

Removing the WLDF Console Extension

To remove the extension:

  1. Stop the Administration Server.
  2. Delete the JAR file from the DOMAIN-DIR/console-ext directory and restart the Administration Server.


Displaying the WLDF Console Extension

When you launch an Administration Console in which the WLDF Console Extension is installed, the Console appears with two tabs, Oracle WLS Console and WLDF Console Extension, as shown in Figure 2-1.

Figure 2-1 Console Extension Tab

Console Extension Tab

By default, the Oracle WLS Console tab is initially selected on login, which shows the standard Administration Console. Select WLDF Console Extension to display the extension.

These two tabs are always present, so you can easily move back and forth between the primary Administration Console pages and the WLDF Console Extension.

Note: All WLDF Console Extension functionality occurs in the context of a Java applet. Each time you select the WLDF Console Extension tab, the applet is loaded.
Note: When you select the Oracle WLS Console tab, the applet is unloaded, and you are returned to the Administration Console context that existed before you displayed the WLDF Console Extension. All activity related to the applet and the WLDF Console Extension is terminated.


Look and Feel Support

The WLDF Console Extension does not implement a specific look and feel (that is, the visual user interface design). Rather, it adopts the look and feel of the environment in which the WLS Administration Console is running:

  • For non-Windows systems, the Console Extension uses the look and feel specified in the Java environment.
  • For Windows systems, the Console Extension uses the default Windows look and feel.
      Tech/weblogic  |  2009. 3. 4. 09:19


<출처 : http://e-docs.bea.com/wls/docs92/ConsoleHelp/taskhelp/security/EnableTrustBetweenDomains.html>


Enable trust between domains


Trust between domains is established so that principals in a Subject from one WebLogic Server domain are accepted as principals in another domain. When this feature is enabled, identity is passed between WebLogic Server domains over an RMI connection without requiring authentication in the second domain. When inter-domain trust is enabled, transactions can commit across domains. A trust relationship is established when the Domain Credential for one domain matches the Domain Credential for another domain.

By default, the Domain Credential is randomly generated and therefor, no two domains will have the same Domain Credential. If you want two WebLogic Server domains to interoperate, you need to replace the generated credential with a credential you select, and set the same credential in each of the domains.

  1. If you have not already done so, in the Change Center of the Administration Console, click Lock & Edit (see Use the Change Center).
  2. In the left pane, click the name of the domain.
  3. Select Security > General. Scroll down and click Advanced.
  4. If present, deselect Enable Generated Credential.
  5. Enter a password for the domain in the Credential text field. Choose the password carefully. BEA Systems recommends using a combination of upper and lower case letters and numbers. If you want a WebLogic Server 6.x Compatibility security domain to interoperate with a WebLogic Server 9.x domain, change the value of Credential in the WebLogic Server 9.x domain to the password of the system user in the WebLogic Server 6.x Compatibility security domain.
  6. Click Save.
  7. To activate these changes, in the Change Center of the Administration Console, click Activate Changes.
    Not all changes take effect immediately—some require a restart (see Use the Change Center).

After you finish

Perfom the same procedure in each domain for which you want to enable trust.

      Tech/weblogic  |  2008. 3. 29. 20:55


archidream's Blog is powered by Daum